Make physical standby Active (Great?!) Again
Leveraging HA/DR architecture for CDC and reducing licensing costs

«Nihil est ex omni parte beatum» - «nothing is perfect in every respect» and when we talk about using СDC/data replication to reduce the load on a transactional system running an Oracle database, we still add two types of load
1) Supplemental logging
2) Reading the redo log
If supplemental logging is required to convert physical replication information into regular INSERT/UPDATE/DELETE data operations, then in some configurations, the additional reading of the redo log can be avoided, as I will discuss below.
HA/DR in the Oracle Database World
Introduced more than 25 years ago with Oracle9i Database, Oracle Data Guard is the Oracle database’s primary means of providing high availability and disaster recovery. To solve the CDC/data replication problem, this allows us to receive information about changes not in the primary database, but in the standby one, and thanks to this, we can avoid, albeit a small, but still additional load associated with reading information about changes in the system from the main database. But that’s not all - Oracle Database Enterprise Edition license includes a Data Guard license. This license enables automatic migration of changes from the primary database to the standby database. To run queries on the standby database, you must purchase an additional Active Data Guard license, which costs approximately 25% of the Oracle Database Enterprise Edition database license price. Using a CDC/data replication mechanism can help reduce the TCO, since the data can be transferred to another system, not necessarily to Oracle Database, and your standby database will thus become the active one (since it will be the source of the data)
Solution
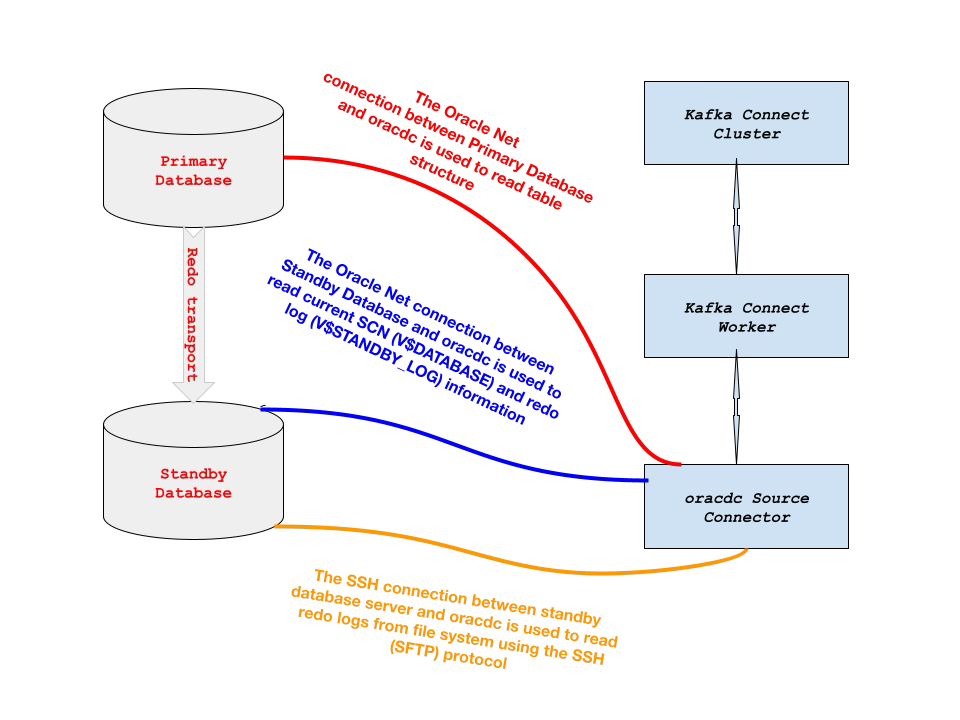
The solution uses the Kafka Connect ecosystem and connects to the primary database in an Oracle Data Guard cluster via Oracle Net for reading Oracle Database dictionary information and the to the standby database in an Oracle Data Guard cluster via two ports - an SSH port for continuously transferring information from the archived and standby redo log files rather than transferring the entire file at once, and an Oracle Net port for reading Oracle Database fixed tables to determine the current SCN and current redo log file.
Pre-requisites
Docker containers
The example uses Docker containers to simplify the deployment process, ensuring fast and consistent deployment of applications regardless of the environment: cloud or on-premise. We only need three images hosted on dockerhub:
one for the Apache Kafka runtime
one for Confluent Schema Registry
and one for building data pipeline between the Oracle Database and PostgreSQL using Kafka Connect.
docker pull bitnami/kafka:latest
docker pull confluentinc/cp-schema-registry:7.7.4
docker pull a2solutions/oracdc:latest
Oracle Database Settings
Oracle Data Guard cluster
You must have a configured Oracle Data Guard cluster, naturally with the ARCHIVELOG mode set and the query
select OPEN_MODE, CONTROLFILE_TYPE, LOG_MODE from V$DATABASE;on the primary database must return
OPEN_MODE            CONTROL LOG_MODE
-------------------- ------- ------------
READ WRITE           CURRENT ARCHIVELOG
on the standby database
OPEN_MODE            CONTROL LOG_MODE
-------------------- ------- ------------
MOUNTED              STANDBY ARCHIVELOG
Oracle Database Supplemental Logging
Oracle Database supplemental logging simply means that all columns or selected columns of table are specified for extra logging. CDC Replication requires supplemental logging. To verify supplemental logging settings at database level log in to the Oracle Database as SYSDBA and execute
select SUPPLEMENTAL_LOG_DATA_MIN from V$DATABASE;If this query returned YES or IMPLICIT for SUPPLEMENTAL_LOG_DATA_MIN column you can configure table-level supplemental logging for the tables participating in CDC/replication using the command below
alter table [<OWNER>.]<TABLE_NAME> add supplemental log data (PRIMARY KEY) columns; If this query returned NO, you need to set it for the entire database using
alter database add supplemental log data;and then set it for the tables participating in CDC/replication using
alter table [<OWNER>.]<TABLE_NAME> add supplemental log data (PRIMARY KEY) columns; Account to connect to the standby database
Since our database is in the ‘MOUNTED‘ state, we need to create a user that will be defined in the password file, not the data dictionary, and will have the SYSDG privilege to query the standby database against the current SCN and the redo log file. To do this, create a user on the primary database and grant him SYSDG permissions
create user C##REDOMINER identified by ReDoMiNeR_2026 temporary tablespace TEMP;
grant SYSDG to C##REDOMINER;
Check it presence in password file
select SYSDG from V$PWFILE_USERS where USERNAME='C##REDOMINER';must return
SYSDG
-----
TRUE
Copy password file to the standby server’s $ORACLE_HOME/dbs directory
scp $ORACLE_HOME/dbs/orapw${ORACLE_SID} oracle@<STANDBY_HOST>:$ORACLE_HOME/dbs/orapw${ORA_STANDBY_SID}Ensure the password file on the standby server has the correct permissions and ownership (usually 600 or 640), then check for the presence of the user account with SYSDG privilege in the password file running against standby database
select SYSDG from V$PWFILE_USERS where USERNAME='C##REDOMINER';If the query above does not return a row, then you need to restart the standby database.
Oracle Wallet for storing privileged user credentials
Since the user for connecting to the standby database that we created in the previous step is privileged (in addition to the SYSDG privilege, SYSBACKUP and SYSDBA are also supported), the solution uses only the account data that is stored in Oracle Wallet.
Before creating an Oracle Wallet, we recommend that you use the Oracle TNS (Transparent Network Substrate) aliases in order to hide the details of the database connection string (host name, port number, and service name) from the JDBC URL definition and instead use an alias. To do this create tnsnames.ora with aliases to primary DGTEST and standby database DGTEST_STBY
DGTEST =
  (DESCRIPTION =
    (ADDRESS_LIST =
      (ADDRESS = (PROTOCOL = TCP)(HOST = dgtest1.a2-solutions.eu)(PORT = 1521))
    )
    (CONNECT_DATA =
      (SERVICE_NAME = DGPDB01)
    )
  )

DGTEST_STBY =
  (DESCRIPTION =
    (ADDRESS_LIST =
      (ADDRESS = (PROTOCOL = TCP)(HOST = dgtest2.a2-solutions.eu)(PORT = 1521))
    )
    (CONNECT_DATA =
      (SID = DGTEST)
    )
  )
Then create a Oracle Wallet at the command line
mkstore -wrl <WALLET_LOCATION> -createThis command creates an Oracle Wallet with the autologin feature enabled at the location specified. Autologin enables the client to access the Oracle Wallet contents without supplying a password and prevents exposing a clear text password on the client. To add database login credentials to an existing client wallet, enter the following command
mkstore -wrl <WALLET_LOCATION> -createCredential <TNS_ALIAS> <USERNAME>For the example TNS alias and account we used above, it would look like this
mkstore -wrl ./wallet -createCredential DGTEST_STBY C##REDOMINER
Oracle Secret Store Tool Release 19.0.0.0.0 - Production
Version 19.4.0.0.0
Copyright (c) 2004, 2023, Oracle and/or its affiliates. All rights reserved.

Your secret/Password is missing in the command line
Enter your secret/Password:
Re-enter your secret/Password:
Enter wallet password:
Unprivileged Oracle Database account for reading data dictionary information
Using Oracle’s Database SYSDBA rights is not an example to follow and you should always follow the principle of least privilege. We recommend using the SQL scripts provided with the solution to grant all necessary permissions to the user who will read the Oracle database dictionary. Current versions of SQL scripts are available
for Oracle Database CDB environment at
for Oracle Database non-CDB environment at
Example commands for creating such a account named C##ORACDC with password oracdc in CDB environment with the connection to CDB$ROOT using supplied scripts stored in the same directory
sqlplus <DBA_USER>/<DBA_PASSWORD>@<TNS_ALIAS_OR_ADDRESS> \
       @cdc_user_cdb.sql \
       C##ORACDC oracdc ALL
In CDB environment with connection to specific PDB (Oracle Database 19.10+ feature). In the example below, the PDB name is CDCTEST, the account name is ORACDC, and the password is oracdc
sqlplus <DBA_USER>/<DBA_PASSWORD>@<TNS_ALIAS_OR_ADDRESS> \
       @cdc_user_cdb.sql \
       ORACDC oracdc CDCTEST
For the Oracle Database 10g/11g or non-CDB environment. In the example below the account name is ORACDC, and the password is oracdc
sqlplus <DBA_USER>/<DBA_PASSWORD>@<TNS_ALIAS_OR_ADDRESS> \
       @cdc_user.sql ORACDC oracdc
PostgreSQL Database
We will need a PostgresSQL database into which we will insert data - there are no specific requirements for it.
Configuration steps
Oracle Database
We need data from the database, and if we don’t have test data at hand, we can always use data from the SCOTT account, which has been around since the creation of the Oracle database. If you are wondering who SCOTT is and why the password is TIGER, read here. To create SCOTT account, simply run on the $ORACLE_HOME/rdbms/admin/utlsampl.sql using SQL*Plus and then enable supplemental logging for SCOTT’s tables (not required if V$DATABASE.SUPPLEMENTAL_LOG_DATA_ALL is set to YES)
alter table DEPT add supplemental log data (PRIMARY KEY) columns;
alter table EMP add supplemental log data (PRIMARY KEY) columns;
Docker
For optimal operation of all containers, we need to create two directories in the host OS that will be used by the container
mkdir -p /var/kafka/broker
mkdir -p /var/kafka/nonheap
chown -R 1001:1001 /var/kafka
These directories are needed to store
Apache Kafka logs
memory mapped files for storing Oracle Database transactions
respectively.
Following is the docker compose file to run all required docker containers
version: '3'
services:
  kafka-broker:
    image: bitnami/kafka:latest
    container_name: kafka-broker
    volumes:
      - /var/kafka/broker:/bitnami/kafka
    ports:
      - 9092
    environment:
      KAFKA_CFG_NODE_ID: "0"
      KAFKA_CFG_PROCESS_ROLES: "controller,broker"
      KAFKA_CFG_CONTROLLER_QUORUM_VOTERS: "0@kafka-broker:9093"
      KAFKA_KRAFT_CLUSTER_ID: "B5fmSKBESZONB-ugBZJCxw"
      KAFKA_CFG_LISTENERS: "PLAINTEXT://:9092,CONTROLLER://:9093"
      KAFKA_CFG_ADVERTISED_LISTENERS: "PLAINTEXT://:9092"
      KAFKA_CFG_LISTENER_SECURITY_PROTOCOL_MAP: "CONTROLLER:PLAINTEXT,PLAINTEXT:PLAINTEXT"
      KAFKA_CFG_CONTROLLER_LISTENER_NAMES: "CONTROLLER"
      KAFKA_CFG_INTER_BROKER_LISTENER_NAME: "PLAINTEXT"
      KAFKA_CFG_OFFSETS_TOPIC_REPLICATION_FACTOR: "1"
      KAFKA_CFG_TRANSACTION_STATE_LOG_REPLICATION_FACTOR: "1"
      KAFKA_CFG_DEFAULT_REPLICATION_FACTOR: "1"
  schema-registry:
    image: confluentinc/cp-schema-registry:7.7.1
    container_name: schema-registry
    depends_on:
      - kafka-broker
    ports:
      - 8081:8081
    environment:
      SCHEMA_REGISTRY_LISTENERS: "http://0.0.0.0:8081"
      SCHEMA_REGISTRY_KAFKASTORE_BOOTSTRAP_SERVERS: "kafka-broker:9092"
      SCHEMA_REGISTRY_HOST_NAME: schema-registry
  kafka-connect:
    image: a2solutions/oracdc:latest
    container_name: kafka-connect
    volumes:
      - /var/kafka/nonheap:/var/lib/oracdc
    depends_on:
      - kafka-broker
    ports:
      - 8083:8083
      - 9083:9083
    environment:
      A2_ORACDC_BOOTSTRAP_SERVERS: "kafka-broker:9092"
      A2_ORACDC_GROUP_ID: "connect-cluster"
      A2_ORACDC_OFFSET_STORAGE_TOPIC: "connect-offsets"
      A2_ORACDC_OFFSET_STORAGE_REPLICATION_FACTOR: "1"
      A2_ORACDC_CONFIG_STORAGE_TOPIC: "connect-configs"
      A2_ORACDC_CONFIG_STORAGE_REPLICATION_FACTOR: "1"
      A2_ORACDC_STATUS_STORAGE_TOPIC: "connect-status"
      A2_ORACDC_STATUS_STORAGE_REPLICATION_FACTOR: "1"
      A2_ORACDC_KEY_CONVERTER: "io.confluent.connect.avro.AvroConverter"
      A2_ORACDC_VALUE_CONVERTER: "io.confluent.connect.avro.AvroConverter"
      A2_ORACDC_KEY_CONVERTER_SCHEMA_REGISTRY_URL: "http://schema-registry:8081"
      A2_ORACDC_VALUE_CONVERTER_SCHEMA_REGISTRY_URL: "http://schema-registry:8081"
Deploy it using docker compose command
docker compose up -dThree ports are open
8081 - for managing Confluent Schema Registry Community Edition via REST API
8083 - for managing the Kafka Connect via REST API
9083 - to export JMX statistics about the performance and work of the Kafka Connect ecosystem and connectors for further use by Prometheus or other management tools
Register Connectors
We need to create two connectors - Source connector to read data from Oracle Database and send it to Apache Kafka and the second to read data from Apache Kafka topics and send it to PostgreSQL.
Source Connector
Let’s create the json file for source connector, name it as oracdc-MpsAGA-test.json
{
   "name" : "oracdc-MpsAGA-test",
   "config" : {
     "connector.class" : "solutions.a2.cdc.oracle.OraCdcRedoMinerConnector",
     "tasks.max" : "1",
     "errors.log.enable" : "true",
     "errors.log.include.messages" : "true",
     "a2.storage.media":"SSH",
     "a2.ssh.provider":"sshj",
     "a2.ssh.hostname":"<STANDBY_DB_HOST>",
     "a2.ssh.user":"<STANDBY_DB_HOST_OS_USER>",
     "a2.ssh.password":"<STANDBY_DB_HOST_OS_USER_PASSWORD>",
     "a2.jdbc.url" : "jdbc:oracle:thin:@tcp://<ORACLE_HOST>:<PORT>/<SERVICE_NAME>",
     "a2.jdbc.username" : "C##ORACDC",
     "a2.jdbc.password" : "oracdc",
     "a2.standby.activate" : "true",
     "a2.standby.jdbc.url" : "jdbc:oracle:thin:@<TNS_ALIAS_FOR_STANDBY_DB>?TNS_ADMIN=<TNS_ADMIN_DIRECTORY>",
     "a2.standby.wallet.location" : "<ORACLE_WALLET_LOCATION>",
     "a2.standby.privilege" : "sysdg",
     "a2.supplemental.logging" : "NONE",
     "a2.include" : "SCOTT.%",
     "a2.tmpdir": "/var/lib/oracdc,
     "a2.oracdc.schemas" : "true",
     "a2.protobuf.schema.naming" : "true",
     "a2.pk.type" : "any_unique",
     "a2.use.rowid.as.key" : "true",
     "a2.process.online.redo.logs" : "true",
     "a2.scn.query.interval.ms" : "5000"
   }
 }
Deploy this connector to Kafka Connect using curl command below
curl -i -X POST -H "Accept:application/json" -H "Content-Type:application/json" http://localhost:8083/connectors/ -d @oracdc-MpsAGA-test.jsonSink Connector
Let’s create the json file for source connector, name it as pg-sink-test.json
{
   "name" : "pg-sink-test",
   "config" : {
     "connector.class" : "solutions.a2.kafka.sink.WrappedDataJdbcSinkConnector",
     "tasks.max" : "3",
     "topics" : "DEPT,EMP,SALGRADE",
     "errors.log.enable" : "true",
     "errors.log.include.messages" : "true",
     "a2.jdbc.url" : "jdbc:postgresql://<PG_HOST>:<PG_PORT>/<PG_DATABASE>",
     "a2.jdbc.username" : "<PG_USER>",
     "a2.jdbc.password" : "<PG_PASSWORD>",
     "a2.autocreate" : "true"
   }
 }
Deploy this connector to Kafka Connect using curl command below
curl -i -X POST -H "Accept:application/json" -H "Content-Type:application/json" http://localhost:8083/connectors/ -d @pg-sink-test.jsonTest it
Voilà - now is the time to check: insert, update or delete data in Oracle and check how these operations are displayed in PostgreSQL
Summary
I hope you liked my approach and that the time spent reading it was not wasted.
Feel free to contact me if you have any questions or if you would like to connect with me on LinkedIn - https://www.linkedin.com/in/averemee/